How to Create Software Packages with Julia Language
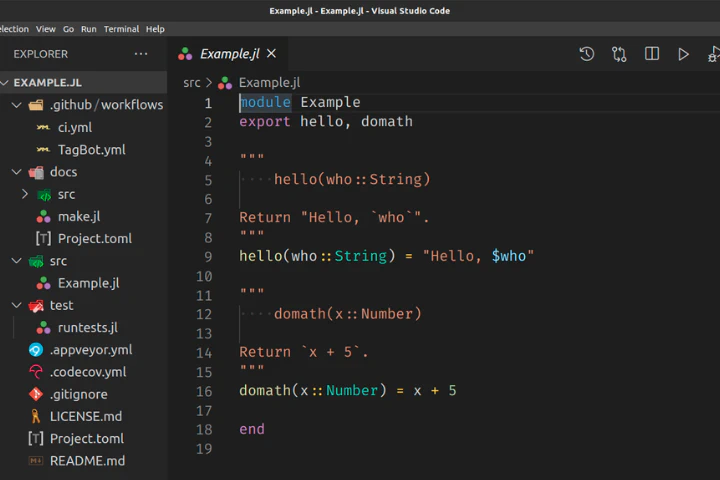
Table of Contents
Introduction
This article will teach you how to create an open-source software package in the Julia programming language and develop your package using Git-based workflows. For example, you will learn how to automate your unit tests and documentation deployment and release new versions of your package. Additionally, we created the Julia Language playlist of step-by-step video tutorials to guide you through the process.
Installing Julia Language
First, we will install the Julia programming language from the downloads page at the julialang website. In Linux, we can extract the archive to the desired location. We will use ~/software/ directory. Then, we need to export the path to the Julia binaries by appending the ~/.bashrc file with the following line:
export PATH="$PATH:$HOME/software/julia-1.5.3-linux-x86_64/julia-1.5.3/bin"
Please, replace the strings julia-1.5.3-linux-x86_64 and julia-1.5.3 with the Julia version you installed.
Julia REPL
We can open the Julia REPL by typing julia to the command line. The Julia REPL has four different modes:
- The Julia mode
julia>for testing Julia code. - The package manager mode
pkg>for executing package manager commands. We can activate it by pressing the right square bracket key]. - The help mode
help?>for printing help and documentation. We can activate it by pressing the question mark key?. - The shell mode
shell>for executing shell commands. We can activate it by pressing the semicolon key;.
We can press backspace to exit back to Julia mode.
If you prefer video, you can watch How to use Julia REPL for Developing Packages on YouTube.
Package Structure
Our package structure will follow the official example of creating a software package with Julia language. We can find the example repository at Example.jl. We can clone the example repository and explore it. The directories that begin with a dot . might be hidden by the operating system. We can show hidden files from the filesystem settings. The Julia package structure looks as follows:
Example/
├─ .git/
├─ .github/
│  └─ workflows/
│     ├─ TagBot.yml
│     └─ ci.yml
├─ docs/
│  ├─ src/
│  │  └─ index.md
│  ├─ Project.toml
│  └─ make.jl
├─ src/
│  └─ Example.jl
├─ test/
│  └─ runtests.jl
├─ .appveyor.yml
├─ .codecov.yml
├─ .gitignore
├─ LICENSE
├─ Project.toml
└─ README.md
Generating Packages
We can generate a new Julia package using the package manager in Julia REPL.
pkg> generate Example
The generate command creates the src/Example.jl and Project.toml files. The src directory contains the source code of the software. The Project.toml file is a configuration file for project details such as name, universally unique identifier (UUID), authors, version, dependencies, and compatibilities. The extras and targets define dependencies for the unit tests.
name = "Example"
uuid = "..."
authors = ["author <email>"]
version = "0.1.0"

[deps]
# <package> = ...

[compat]
julia = "1"

[extras]
Test = "8dfed614-e22c-5e08-85e1-65c5234f0b40"

[targets]
test = ["Test"]
We can add new package dependencies to the Project.toml using the add command in the package manager.
pkg> activate .
(Example) pkg> add <package>
We can find the reference for all commands in the Pkg.jl documentation.
If you prefer video, you can watch How to Create Software Packages with Julia Language on YouTube.
Unit Tests
The test/ directory contains all the code files for unit tests in a Julia package. We can use the Unit Testing module for creating tests. All tests are executed from test/runtests.jl file. We can write test cases as follows.
using Test
@test [1, 2] + [2, 1] == [3, 3]
@test_throws BoundsError [1, 2, 3][4]
We can run unit tests using the test command in the package manager.
pkg> activate .
(Example) pkg> test
Later, we set up the GitHub actions to execute the test automatically as part of the build process.
Documentation
The docs/ directory contains the documentation of Julia package. Documenter.jl is a documentation package for Julia projects. Inside the generated Example directory, we can initialize the documentation using DocumenterTools.jl in Julia REPL as follows:
pkg> add DocumenterTools
julia> using DocumenterTools
julia> DocumenterTools.generate()
We write the documentation into docs/src/ directory using Markdown, a light-weight markup language. We can also document code using docstrings as follows.
"""A foo function.

# Arguments
- `arg::Int`: Function argument.
"""
function foo(arg::Int)
    # ...
end
Documenter.jl can then create the API documentation from the docstrings as follows.
```@docs
foo(::Int)
```
We can also refer to API documentation using the syntax [`foo`](@ref).
We can build the documentation by executing docs/make.jl file.
julia make.jl
The build generates the documentation files to the docs/build/ directory. We can view the documentation by opening the docs/build/index.html file using a browser. Later, in the GitHub section, we explain how to set up GitHub actions to publish the documentation as a webpage automatically to GitHub pages.
Creating Git Repository
Inside Example directory, we can initialize the version control using the following Git command:
git init
The command creates .git/ directory where it stores the project’s change-history. We should also create .gitignore file, which tells Git to ignore specific files, such as binaries and build-files, from the change history. We should copy the appropriate templates from gitignore templates repository. For a Julia project, we copy the Julia.gitignore file.
GitHub Repository
Next, we should navigate to GitHub and create a remote repository named Example.jl. Using the .jl extension is a convention for naming Julia packages.
Then, we add the remote repository as the origin of our project.
git remote add origin <remote-repository-url>
Finally, we should push the local repository to the remote repository.
git push origin master
GitHub Pages and Actions
We can use GitHub’s Actions and Pages features to run unit tests and deploy documentation on the web automatically. We can activate GitHub Actions by adding the .github/workflows/ directory to our repository and creating configuration files inside it. We have separated the ci.yml file in the example into Runtests.yml and Documenter.yml files to run unit tests and Documenter separately.
We have Runtests.yml configuration file as follows:
name: Runtests
on: [push, pull_request]
jobs:
  test:
    runs-on: ${{ matrix.os }}
    strategy:
      matrix:
        julia-version: ['1.4']
        julia-arch: [x64]
        os: [ubuntu-latest] # [ubuntu-latest, windows-latest, macOS-latest]
    steps:
      - uses: actions/checkout@v2
      - uses: julia-actions/setup-julia@latest
        with:
          version: ${{ matrix.julia-version }}
      - uses: julia-actions/julia-buildpkg@latest
      - uses: julia-actions/julia-runtest@latest
We have the Documenter.yml configuration file as follows:
name: Documenter
on:
  push:
    branches:
      - master
    tags: '*'
  pull_request:
jobs:
  build:
    runs-on: ubuntu-latest
    steps:
      - uses: actions/checkout@v2
      - uses: julia-actions/setup-julia@latest
        with:
          version: '1.4'
      - name: Install dependencies
        run: julia --project=docs/ -e 'using Pkg; Pkg.develop(PackageSpec(path=pwd())); Pkg.instantiate()'
      - name: Build and deploy
        env:
          GITHUB_TOKEN: ${{ secrets.GITHUB_TOKEN }} # For authentication with GitHub Actions token
          DOCUMENTER_KEY: ${{ secrets.DOCUMENTER_KEY }} # For authentication with SSH deploy key
        run: julia --project=docs/ docs/make.jl
Next, we must set up the GITHUB_TOKEN and DOCUMENTER_KEY secret values as explained in the Hosting Documentation section. First, execute the following commands on Julia REPL.
pkg> activate .
julia> using DocumenterTools
julia> DocumenterTools.genkeys()
Then, follow the instructions described in the output, which looks as follows:
[ Info: add the public key below to https://github.com/$USER/$REPO/settings/keys with read/write access:

[SSH PUBLIC KEY HERE]

[ Info: add a secure environment variable named 'DOCUMENTER_KEY' to https://travis-ci.com/$USER/$REPO/settings (if you deploy using Travis CI) or https://github.com/$USER/$REPO/settings/secrets (if you deploy using GitHub Actions) with value:

[LONG BASE64 ENCODED PRIVATE KEY]
Documenter action will generate the output of make.jl to the gh-pages branch in the repository, which forms the contents of the GitHub pages.
If you prefer video, you can watch How to Setup GitHub Actions for a Julia Package on YouTube.
Versioning and Releasing
Semantic Versioning
Software versioning is essential for marking new developments in software and ensuring compatibility with other software. Julia packaging follows the conventions of semantic versioning, where we update version numbers in the form major.minor.batch. We recommend reading a detailed description and instructions about semantic versioning from the semver.org website.
Package Registry
In software engineering, releasing refers to publishing a new version of our software package. We can release Julia packages to the Julia package registry. Julia Registries also maintains the Registrator GitHub app and TagBot GitHub action, which we can use to automate the release process.
We begin by installing the Registrator.jl GitHub app by pressing the install app button and selecting our repository.
Tagging Versions
We continue by adding the TagBot GitHub action to our repository. TagBot automatically tags new version releases. We can set it up by adding TagBot.yml configuration file to the .github/workflows/ directory.
name: TagBot
on:
  issue_comment:
    types:
      - created
  workflow_dispatch:
jobs:
  TagBot:
    if: github.event_name == 'workflow_dispatch' || github.actor == 'JuliaTagBot'
    runs-on: ubuntu-latest
    steps:
      - uses: JuliaRegistries/TagBot@v1
        with:
          token: ${{ secrets.GITHUB_TOKEN }}
          ssh: ${{ secrets.DOCUMENTER_KEY }}
Release Process
After setting up the Registrator app and TagBot action, we can move on to the release process, which we can use to release all future versions of our package.
Before releasing a new version, we should update compatibilities [compat] for all of our dependencies [deps] in Project.toml configuration file and check that automated unit tests pass and documentation is building without errors.
To release a new version, we need to update the version string in the Project.toml configuration file using semantic versioning principles.
name = "Example"
uuid = "..."
authors = ["author <email>"]
version = "0.1.0"  # update the version string!
...
Then, we can add the updated version string to Git.
git add Project.toml
Finally, we need to comment on the commit as follows.
git commit -m "@JuliaRegistrator register"
Once we push the commit, the Registrator app registers a new version of the package, and TagBot action tags the commit with the new version string. TagBot action also triggers a documentation build for the new package version.
Readme
The README.md file’s goal is to instruct people on installing the program and showing a simple usage example. The readme should contain the following sections:
Short description explains the purpose and function of the project. Optionally, we can include badges to indicate test success, code coverage, and build status. We can make arbitrary badges with Shields IO.
Usage example provides a clear and straightforward example of getting started using the project.
Installation instructions provide clear instructions on how to install the project.
Development instructions provide instructions on how to get started developing the projects. They should include how to run tests and build the documentation.
Licensing
A software license communicates which rights the users have to use and distribute the software package. Packages contain their license in the LICENSE textfile. We should always include licenses in our projects. We recommend using an open-source license, such as a permissive MIT license. If you plan to create open-source software with commercial applications, you should read more about licensing, especially copyleft licenses such as GPL and AGPL from GNU licenses.
Using PkgTemplates.jl
Once you have understood the basic components of a Julia package, you can take the packaging process to the next level by using the invenia/PkgTemplates.jl package. With PkgTemplates we can generate Julia packages with all the package components discussed in this article and more by writing and executing a Julia script. Automating package creation reduces the friction of creating proper Julia packages, even for small projects. Here is a small sample script for creating MyPackage with minimum Julia version of 1.3.0, MIT license, Git repository with SSH, and GitHub actions for unit tests and Documenter:
using PkgTemplates
t = Template(
    user="jaantollander",
    dir=".",
    julia=v"1.3.0",
    plugins=[
        License(; name="MIT"),
        Git(; ssh=true),
        GitHubActions(),
        Documenter{GitHubActions}(),
    ]
)
t("MyPackage")
PkgTemplates.jl is the default way to create packages as of Julia 1.6, and we highly recommend using it!
Conclusion
You can now start creating and publishing your own Julia software packages to earn yourself the title of a Julia developer. Go and get after it!
Contribute
If you enjoyed or found benefit from this article, it would help me share it with other people who might be interested. If you have feedback, questions, or ideas related to the article, you can contact me via email. For more content, you can follow me on YouTube or join my newsletter. Creating content takes time and effort, so consider supporting me with a one-time donation.
Jaan Tollander de Balsch
Jaan Tollander de Balsch is a computational scientist with a background in computer science and applied mathematics.